Author Archives: Thistle

Cajun Bloody Mary

Cajun Bloody Mary

Bloody Marys are synonymous with football for me. I drink more Bloody Mary’s while yelling at the TV on Sunday mornings than any other time of year. Let’s face it, waking up and drinking is hard work. And a thick, savory Bloody Mary just…makes that responsibility a little easier.
When I’m back home in Portland on autumn Sundays I have to convince my family to turn football on at all. And the carrot at the end of that stick: is Bloody Marys. I found Emeril’s Cajun Bloody Mary recipe on one of these weekends and started from there. The only thing I changed was the amount of “Emeril’s ESSENCE” in a pitcher, to at least double what he calls for.
My mother, well versed in the Bloody Mary, told me this was the best Bloody Mary she’s ever had. That was more than enough for me to hold on to this recipe as “how a Bloody Mary should be made”. We ended up flying through one pitcher, as neighbors stopped by and stuck around…for football or Bloodys I’m not interested in speculating, but we ended up with a crowd, and that’s one of the best parts of football season.

So just in time for the playoffs, whether your team is still on the field or….not. A Bloody Mary will undoubtedly make the game better.

INGREDIENTS
1 1/2 cups tomato juice
3/4 cups vodka
1 1/2 tablespoons fresh lemon juice
1 1/2 tablespoons fresh lime juice
1 tablespoon horseradish (the real, spicy kind, not horseradish sauce)
1 1/2 teaspoons Worcestershire sauce
2 teaspoons hot sauce (I used Cholula, but anything with a flavor you like will work)
1-2 Tbsp. “Essence” (see recipe below)
1/4 teaspoon cayenne
Salt and Pepper to taste

Pickled green things for garnish
My favorites include: green beans, asparagus and olives. One time I was served a pice of pickled broccoli at Besaw’s. That, too, was amazing.

DIRECTIONS
-Combine. Chill. Enjoy.

EMERIL’S ESSENSE
– Combine the following spices: (makes about 2/3c.)

2 1/2 tablespoons paprika
2 tablespoons salt
2 tablespoons garlic powder
1 tablespoon black pepper
1 tablespoon onion powder
1 tablespoon cayenne pepper
1 tablespoon dried oregano
1 tablespoon dried thyme

Paleo Banana Bread

Paleo Banana Bread

I’ve been cutting a lot more grains out of my diet recently. All grains, to some extent, are hard to digest and I just feel better when I don’t eat them. Trying to dodge around diet restrictions, making gluten free cookies or ordering gluten free pancakes for brunch increasing feels like a thinly veiled lie to myself that I can bake a cake and eat it too…so to speak.
One type of flour that I—at least up to this point—seem to have no trouble with though is almond flour, which apparently lends itself beautifully to sweet breads. I found several recipes for zucchini breads, banana breads, pumpkin breads, etc. and the best part is how simple they are. You don’t have to mix 3 different kinds of flours (usually at least two of which I’m not supposed to eat anyway) along with xanthum gum (which just makes me feel like I’m running an elaborate science experiment) to concoct something that really does need gluten to give it the familiar consistency you crave. Loafs should be heavy and moist, and therefore can rely on ingredients other than gluten for structural stability. Almonds also make a flour with a mild flavor but one that compliments most breads.
This banana bread isn’t very sweet at all, which makes it a great on the go breakfast option, but can also be toasted and slathered in honey and almond butter, which is my go to for a healthier dessert.

INGREDIENTS
3 bananas
3 eggs
1 Tbsp. vanilla extract
2 Tbsp. honey
¼ c. coconut oil
2 c. almond flour
½ tsp salt
1 tsp baking soda

DIRECTIONS
– Preheat oven to 350°f
– Blend bananas, eggs, vanilla, honey and shortening in a kitchenaid or food processor.
– Add almond flour, salt and baking soda and mix until well combined
– Pour batter into greased loaf pan (use 7½” x 3½” or similar for taller, loaf-life slices)
– Bake at 350 for 55-65 minutes.

Welcome, 2014!

New Years Arches

I hope everyone is spending their new years day getting started on resolutions…or enjoying one last day before resolutions kick in (that can wait til the work week begins, right?) or at least in some way celebrating the turning of a new leaf.

I drug my self not only out of bed but out of the house today to finally catch up on the growing list of recipe posts I’ve been meaning to write for the past several months. So this is an announcement that new posts will be coming! And also an apology that some of them may be slightly holiday inspired…I’ll try to play that down given that January is much better for looking forward than back.

I am also planning to sort through all my photos from my Spain trip back in October (seriously, this is how late I’m running). And so in lieu of a food photo today, I’ve collected a few of my favorites above. Moroccan windows and archways are some of my most favorite architectural details, and to borrow a new years greeting I received myself from the ever caring and eloquent head of design at my alma mater: Here’s to opening new doors and windows in the New Year! That message resonated with me today, and thank you to Dan Boyarski for sending it to me.

And because I can’t completely abandon all recipes for this post, I will, of course, be making black-eyed peas this afternoon based on this post. This year I think I’ll add some butternut squash and, in a bit of a nod to 2013, kale. I think it will maximize my luck potential for the year!

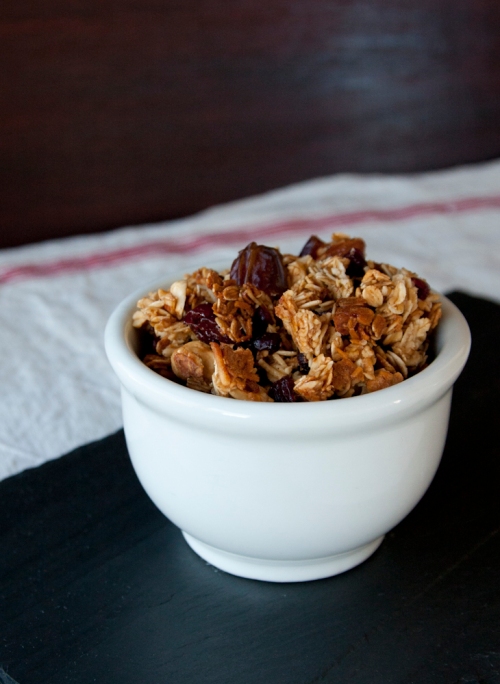
The Best Big Cluster Granola (gluten free)

Best Cluster Granola
One of the many (oh so many) things I miss being gluten free is granola. I think a lot of my frustration comes from granola really not needing to have gluten in it at all, so I feel like I’m being robbed of yet another tasty comfort food, and one that rather successfully masquerades as “healthy”. Most of the ingredients in amazing granola are things I eat every day, almonds, dried fruit, honey, and so one particularly taxing Saturday in the midst of finals I decided to take a break from work and make a stress-relief comfort snack.
I started with The Smitten Kitchen Cookbook’s Big Cluster Maple Granola recipe. While reading and mentally commiserating with Deb Perelman’s long search for a simple, not-too-sweet, extra clustery granola. The trick is in adding an egg white to bind, meaning you need less honey/maple syrup or other sweetener to do the job. The egg white also, when cooked to the right stage (more on that in a minute), makes for great crispy edges while keeping large clusters still chewy in the middle.

A note on taking liberties
The great thing about granola is that you can really add or subtract many of the ingredients to your taste. Maybe this is another reason I’m especially drawn to it. As far as I’m concerned, the nuts, fruits and spices listed in the recipe below are primarily notes for overall quantities. I found that almonds would fabulously, hazelnuts, on the other hand (and very unfortunately) I found really distracting taste-wise. The original recipe calls for a full 1½ cup of dried cherries. I combined some cherries with some cranberries and chopped dates. I highly recommend the dates. Finally, as you may have noticed, I double a lot of spice amounts in my recipe adaptations. For this one I actually halved the cinnamon and added a couple other things to make the kitchen smell a little less like Christmas. My point here is that I hope you take some liberties with the additional flavors to suit the season, and your own taste.

Gluten-Free Giant Cluster Granola
Granola close

Ingredients
3c. old-fashioned rolled oats (I used Bob’s Redmill Gluten Free)
1c. shredded coconut
1c. almonds, pecans, walnuts or your favorite nut combo
2 Tbsp. olive oil
½ tsp. salt
2/3c. honey (substitutable for maple syrup or agave nectar. I had honey on hand and I’m not a huge maple fan, so that made my decision).
Pinch each of cinnamon, ground cloves, ground ginger
Splash (about ½ tsp) vanilla
1 large egg white
1½ c chopped dried fruit. I used a combination of cherries, cranberries and dates.

Directions
Preheat your oven to 300°f. Combine all ingredients except egg white and dried fruit in a large bowl and toss to coat. Whisk egg white in a small bowl until frothy and pour over granola and stir until all ingredients are well combined. Spread granola into a single layer over a parchment-lined baking sheet and bake for 35-40 minutes, rotating tray about half way through. When granola is just starting to brown and feels dry to the touch, remove from the oven and let cool completely before breaking into pieces. (I can’t tell you how many times I have learned the hard way the value of letting something cool completely. Especially with brittle GF flours this makes a huge difference. Now when a recipe calls for patience, I just do as I’m told. In this case, your clusters will thank you.) Break granola into a bowl alternating with a sprinkle of dried fruit to mix throughout.
Granola can be stored at room temperature in an airtight container for about 2 weeks, or much longer in the freezer (believe it or not this stuff is even delicious frozen) which is what I have to do to stop myself from eating the whole batch in a couple days.
Granola pretty

Tagged , ,

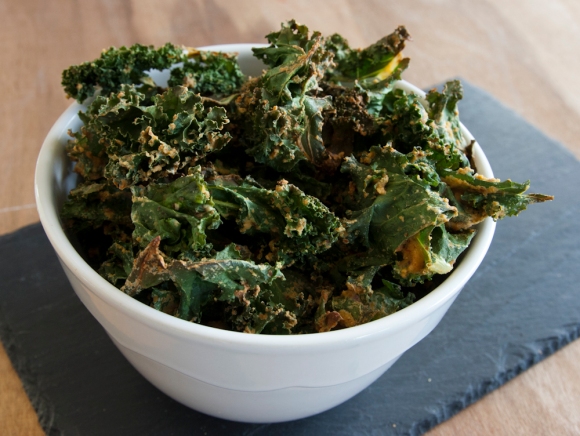
The Best Cheesy Kale Chips

Bowl of Chips

When my mother used to tear kale leaves into bite-sized pieces and bake them with olive oil and salt in a hot oven until just browning and slightly crispy I should have known she was on the cutting edge of yet another trend. While our family savored the simple yet oh so tasty and nutritious treat that allowed us to eek out just a few more minutes of eating-together time, the food trend mavens were cooking up a health snack trend to be reckoned with.
When I started seeing kale chip recipes in magazines on food blogs I was happily reminded of what I thought was my mother’s hidden gem. When I started seeing 6oz packages of it for sale at Whole Foods and Rainbow Acres for $11, I was just resentful that I hadn’t exploited the idea 15 years ago. Yes, now kale chips are the hottest fad in healthy (vegan and gluten-free) snacking. I cannot claim to be the first to get on board, but I am finally getting around to making my own, which, I will admit, will become a regular addition to my snacking repertoire. Thanks to Missy for introducing me to nutritional yeast, you are always an inspiration in flavors, especially secretly healthy ones.

Recipe Notes
I started out with a few nacho kale chip recipes, trying to figure out what was what, but by the third time I was so tired of making such a mess of my food processor and honestly, found the cashew (or almond, I tried both, stick with cashew) paste version a little heavy. Now my go-to flavoring is MUCH simpler and I think much more flavorful.

For the Seasoning
Combine in a small bowl:
1/3-1/2c nutritional yeast
1tsp cumin
½ tsp cayenne
a few good sprinkles of dried garlic or garlic salt
½ tsp fresh ground pepper
a bit more salt than you think you should have. Start with ½ tsp, mix well and test again, you should be able to taste the salt (if you’re using garlic salt just keep an eye on the saltiness).

mix seasonings well, everything together should noticeably change the color of the nutritional yeast when you started, but specific measurements are definitely to your preferred taste.

For the Chips
In a large bowl toss:
1 bunch kale, torn in pieces with tough stalks removed
with some olive oil to coat.
Liberally sprinkle the cheesy mixture over the leaves, use your fingers to make sure to get the flavor in all the leaves. Toss a bit, then sprinkle some more until well coated.

Spread on a large cookie sheet (give the leaves some room!) and bake slowly, in a 300°f for about 12-15 minutes. After about 10 minutes pull the tray out, toss the leaves and check for brownness, you want to stop just as some of the smaller leaves are browning for maximum crispiness without burning.

Kale chips staged

The image below is from one of my test runs with the cashew paste version of the nacho sauce. The dressing is much heavier but this recipe should look pretty much the same with the orange of the nutritional yeast and density of the leaves on the tray.
before the chips

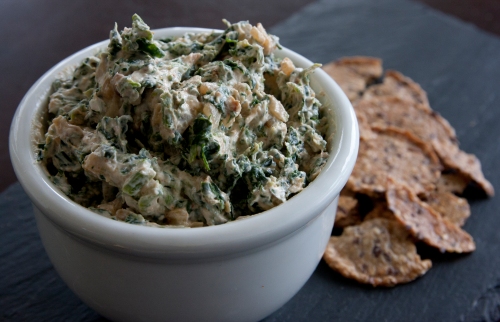
Spicy Spinach and Yogurt Dip

Spicy Spinach Yogurt dip
Superbowl snacking becomes a lot less fun when you’re avoiding gluten and anything fried. So I was determined to find something delicious when one of the dozen emails Food&Wine has sent me this week promised healthy Game Day recipes.
I adapted this recipe from them, Food&Wine has yet to steer me wrong, but I did tweak the proportions. I’ve detailed changes below but I like my yogurt dip fairly yogurty, Food&Wine, apparently, does not. I also tweaked the spice levels and used a brand new bottle of cayenne. Maybe I just haven’t had fresh cayenne for too long, but this dip packs a surprising punch.

INGREDIENTS
2 Tbsp EVOO
1/3 c. pine nuts
½ small-medium sweet yellow onion, minced
1 tsp. cumin
½ tsp coriander
½ tsp cayenne
10 oz frozen spinach, thawed
1½ c. plain greek yogurt
salt to taste.

DIRECTIONS
Sauté onion and pine nuts in the olive oil until the just start to brown, 4-5 minutes. Add spices and stir well. Remove to a medium-mixing bowl.
Squeeze as much water out of the spinach as you can. Don’t worry about the volume, it won’t look like much, but it’s really quite dense. Add to the onions and pine nuts.
My recipe said to drain the yogurt until you end up with about ½ cup. While I drained it, the volume definitely didn’t decrease that much. And in the end I added much more until the proportions felt better to me. My suggestion is to use about 1½ cups yogurt, straight from the fridge. Add the yogurt and mix well. The spinach may be rather stubborn so make sure to disperse large lumps.
Sprinkle with salt and unless serving immediately let sit for at least an hour or two before tasting for salt again. This is a great dip to make ahead of time, say, the day before the super bowl leaving your Game Day morning one-item lighter, and allowing your free hand to crack open an early beer (you know you want to).

The Great Florentine Tradition

Morning Tea
As usual, I’m posting pretty late. The Christmas cookie storm has long been replaced by black eyed pea soups for the new year and vegan dips to help maintain resolutions, but this was the second year I made these bars for my family and this year my dad declared that they would have to become a holiday tradition.
My family doesn’t have a lot of recipe traditions. (Discovering the truth about the date balls I grew up thinking my grandmother made every time I visited coming crashing down when she permanently retired from cooking, but the date balls kept coming, brought this to light recently) So instating a cookie, or bar really, as a “family tradition” meant a lot to me. It probably had a lot to do with a few key ingredients that make this decadent dessert perfect for my intestinally challenged family: The original recipe I found called for gluten free flour. I have since become gluten free and so have tried it both ways. Notes on gluten-free flour follow but this was a huge plus for us this year. Also the recipe has always called for a drizzle of chocolate over the top. I have always intended to do this, get all the way through cooking, and realize how frickn good they are without chocolate. My dad, who is allergic to chocolate has always very much appreciated this last minute laziness and now that’s just how they are for me. Beyond that, almonds, apricots and cranberries smothered in gooey caramel? You really can’t go wrong.
So if they’re a family tradition they’re never really too late to share, right? I’m really just super early for next year. Or maybe I’ll make a batch for Valentine’s Day.

*gluten-free flour: I am still hoping to find the particular flour mix that magically can be seamlessly substituted for gluteny flour leaving cookies chewy, biscuits fluffy, and no one the wiser, but I haven’t found it. I like King Arthur’s Gluten Free Flour Mix a lot, but for this recipe used an Arrowhead Mills mix. It worked surprisingly well for the lobster pot pie we made but was pretty crumbly for this recipe. Make sure to chill the bars completely before you cut them to help with this problem.

Apricot Cranberry Florentine Bars
(adapted from Sweet Twist of Blogging)

INGREDIENTS
Crust
3/4 cup (a stick and a half) butter
3 egg yolks, room temperature
1/2 cup brown sugar
1 cup gluten free or AP flour
1/4 tsp salt
1 tsp orange zest

Filling
6 Tbsp unsalted butter
1 cup granulated sugar
1/3 cup heavy cream
1/4 cup honey
1 cup sliced almonds
½ cup dried cranberries or dried cherries
½ cup dried apricots
1 tsp orange zest

DIRECTIONS
For the Crust
Preheat oven to 350F. Line a 10 inch square pan with parchment paper and spray with non stick spray. Make sure the parchment reaches all the way up the sides of the pan.
Beat together butter and egg yolks until combined in a stand mixer. Add brown sugar and 1tsp zest and beat until light and creamy. Add flour and salt and blend until just combined.
Press the dough in to the pan. If you use gluten-free flour it will be extremely sticky, just stick with it, show it who’s boss. Bake crust 15 minutes, or until golden, remove from oven and let cool.

For the Filling
Heat butter, sugar, cream and honey over medium heat. Continue to cook until a candy thermometer reaches 240F, about 5 minutes.
Remove from heat and stir in almonds, zest and dried fruit. Pour over cooled crust. Bake another 15 minutes.
Allow bars to cool completely before cutting. I left mine in the fridge for a bit just to make sure the gooey deliciousness is solid enough to keep the crust together when you cut through it. If you can remove the sheet of bars by pulling up on the parchment paper this will really help with the cutting process, but cutting in the pan is fine too, just be careful not to peel up the parchment too!

Florentines night

Friendsgiving

Chicken Liver Pate
Several weeks ago my token hostessing friend in LA decided to gather the extended crowd together for a Friendsgiving celebration potluck. (yes, this post epitomizes the #latergram-ness of my holiday documentation). The Google+ invite immediately exploded with dibs on dishes everyone wanted to bring, and the universal claim that each invitee’s family stuffing recipe was the best. Despite my solid—and completely correct—belief that my own mother’s stuffing is, in fact, the best in the world, I took the opportunity to try a dish I’d never made before but that had been on my To Try list for many months: pâté.
My parents’ long-time neighbor and friend, and my own frequent inspiration for many of my side dishes, had served the Silver Palate’s chicken liver pâté at a Christmas party the year before and ever since I had wanted to give it a try. I followed the Silver Palate recipe to the letter (at least the way it is printed here, as my print copy was in a box in Oregon) with the one addition of a handful of roughly chopped pistachios along with the currants. This was in honor of my favorite chicken liver mousse from Viande Meats which, for all you Portlanders, can still be found at City Market and should not be missed.

I served this pâté next to spiced sweet potato hummus for the vegetarians in attendance and both were extremely well received. The hummus recipe is also below, but due to my poor timing and the considerable lack of light hours in November the photos really don’t merit their own post… But then I’m a visual cook.

Also a quick note on brandy: I’m told that calvados is the ‘secret ingredient’ of this recipe and what many adherents swear by as the reason this pâté is so delicious. So if at all possible, don’t substitute the calvados!
Pate with Raincoat Crackers

Silver Palate Pate with Pistachios

INGREDIENTS
2 ribs of celery, with leaves
6-8 whole peppercorns
6 cups water
pinch of salt
1lb chicken livers
pinch of cayenne
1 cup (2 sticks) butter
2 tsp dry mustard
½ tsp grated nutmeg
¼ tsp ground cloves
½ medium onion, roughly chopped
2 cloves garlic
¼ cup calvados
½ cup (or a little less) dried currants
¼ cup (or a little more) roughly chopped pistachios

DIRECTIONS
Boil the celery and peppercorns in the water. Add salt and lower to simmer for 10 minutes.
Add livers and simmer very gently for another 10 minutes. The livers should still be slightly pink on the inside.
Drain and remove livers to a food processor. Add all remaining ingredients except currants (and pistachios if using). Process until very smooth.
Scoop into a bowl and mix in currants and pistachios. (I saved a few of each to press into the top) smooth top, cover with saran and chill for about 4 hours.
Before serving, allow to rest at room temp for about 30 minutes. Makes about 3 cups of very rich, creamy pâté.

Bonus Recipe: Spiced Sweet Potato Hummus!
I also served a slightly modified version of this Sweet Potato Hummus from Vegetarian Ventures.
Sweet Potato Hummus
Her photos are infinitely better than mine and make me want to rush out and buy a box full of these swing-top jars for my kitchen adventures.
I just used a can of chick peas and doubled all the spices (my general rule of thumb, especially with hummus) and sprinkled a little extra cinnamon on top to serve. Delish!

Tagged , ,

Some Shockingly Pink Hummus


Hey remember that post back in…august or september, where I complained for awhile about how little time I have to post new recipes and photographs? Turns out quarter two of my new life as a full time employee/pretty much full time student hasn’t proven to be much different than the first. I have, however, managed to squeeze a few notable life changes into the last few months, making them feel like the last few years.
I went to Brazil! As referenced in the short, sweet, expose on Brazilian coffee in the last post. I’m still talking about it because Brazil was at the top of my geographical bucket list and to be perfectly honest I do consider myself a slightly different person now that I’ve seen it.
Also I moved! Over an excruciating October of apartment searches, lease signings, roommate finding, packing, loading, driving, unloading, unpacking I have left the haven that was my old Spanish apartment in Long Beach for a very modern (but lovely, really) unit in West LA. It was a marathon, but the absolute best part of the new place are the floor to ceiling windows that wrap around the living/dining nook across from the kitchen. I’m ecstatic to try some shots in a natural light-flooded space, so with any luck (maybe holiday cookies???) I’ll post new photos soon!

In the meantime, I’ve been sitting on these bright pink photos for much too long waiting for a chance to post. A friend of mine (and new neighbor now! So excited, Missy!) and fellow football fan made beet hummus for one Sunday game and I couldn’t stop thinking about it for days, had to try it myself. It’s about as easy as you can get. Steam or roast the beets before hand, and then blend them right on in to your standard hummus recipe! I never measure my hummus ingredients anyway so season to taste and you’re done! A slightly more finite recipe follows.

I love this colorful and flavorful hummus idea. It’s a great gluten-free snack option. It’s great on any veggies and I even dolloped some squash soup with it for a hot/cold color shock in some orange soup!
Next I’m thinking maybe avocado hummus? If you have a favorite hummus flavor or suggestion let me know!

Shockingly Pink Beet Hummus
INGREDIENTS
3-4 medium beets (about 1-1½ cups cooked)
1 can chickpeas
1-2 cloves garlic
3 Tbsp Tahini
3 Tbsp Olive Oil (depending how much you like/want oil. You could use as little as 2 probably, and some recipes suggest ¼ c. for me it really has to do with consistency. I start with a little less, and then add right at the end if I want to thin out the hummus without watering it down)
1-2 tsp cumin

DIRECTIONS
Peel and cut your beets in to medium chunks and either boil until tender or toss in some olive oil, salt and pepper and roast in a 415 degree oven for about 20 minutes. I love roast veggies and made some extra so this is what I did.
In a food processor pulse the chickpeas and beets with at least some olive oil and tahini to start for lubrication. The beats will also add a good amount of moisture. Add the garlic, cumin, salt, pepper to taste and more oil, tahini, or lemon juice if you prefer, until you have the right taste and consistency.
Note that the flavors will meld when you chill the hummus in the fridge (at least 20-30 minutes is best) and it will also thicken as it cools. So if your warm hummus is a bit runny that’s totally normal.

Brazilians: And Their Coffee


As you can imagine, experiencing Brazilian coffee at the source was a huge excitement for me when I learned I’d be going to Sao Paolo on business for a week.
Unlike the American mantra of ‘more is more’, Brazilians inhale their coffee in tiny, shot-sized cups. But even though the quantity of liquid is much less, the time taken to consume it is nearly equal, the Brazilians sipping slowly over a highly animated conversation (about what, I have no idea, I still don’t speak Portuguese), and the amount of caffeine is much more. The Brazilians love their sweets, but I am baffled by the nation-wide sweet tooth that this country endures and still cannot top ours in obesity rates.

My favorite cookie in the enormous packaged cookie aisle. And these really charming sweet carts were also all over Paraty, but i didn’t manage to snag a shot myself, Paraty sweet cart ..but i digress.

The point is, sweet coffee is no exception to this rule. A trail of sugar packets follows any coffee drinker wherever he goes. Even I, after late night dinners with clients found myself supplementing the little shots with copious amounts of sugar.
Cappuccinos, however, are a whole separate matter. It took me several days to realize that to Brazilians, this is where a cappuccino comes from

I don’t know if it’s the ease of preparation of the built in sweetness but about the third time I ordered a cappuccino and the beautiful little cup of foam that appeared was filled tasted a lot more like hot chocolate with a large lump of sugary powder at the bottom, I realized Brazil and I were not on the same coffee page. I mean what are they playing at. They have the abominably strong coffee, and they’re already going to the trouble of steaming the milk. Why not just make a real cappuccino?! But alas, I’m sure this question too would have been lost in translation.

I’ll admit that I developed a special soft-spot for the instant hot chocolate masquerading as a serious beverage. I began looking for it in grocery stores once I figured out the ploy, but couldn’t get my hands on any. If anyone knows where to find it, particularly with unintelligible Portuguese directions for ‘brewing’ on the back, I’d be ever so grateful.